CLICK HERE FOR FREE BLOGGER TEMPLATES, LINK BUTTONS AND MORE! »

Friday, June 25, 2010

Finding my Happy Place

With the way I have been hurting lately, it's a bit hard to find my Happy Place, but that doesn't mean I should give up. I haven't been able to do a lot of the things I've wanted to because of the pain, so I'm just doing a little bit at a time. There have been several times where I have to stop & go sit down because I'm hurting and then when I feel better I come back to start working on my project again & for the life of me I can't remember what I was going to do, so then I start working with what is in front of me. Usually half way through once things are adhered and basically put together, it dawns on me where I was wanting to go with the project - which leads to another start for the next one I work on. lol

You have been given a small glimpse of what it's like to be in my head! LOL


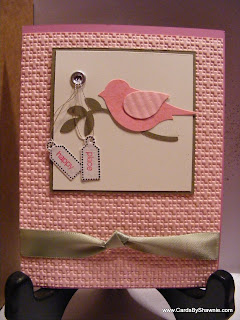
I couldn't wait to use my new latice embossing folder, so when it was delivered I got busy with it. I ordered it over a month ago but it's been on back order. With the above project I also used my Extra Large 2-step Bird Punch, Tiny Tag punch, an eyelet, thread, and a ribbon. If you look close enough to the birds' body, you'll see I stamped a flourish image with versamark to leave a watermark of the design on the body of the bird.
More Birds! The stamp set used for this project is Watercolor Trio, the sentiment is also included in that set as well. I have been playing around with distressing, so be prepared to see more of that included with my projects in the future.

For this card I used my crimper to crimp the matt and naked chipboard as an embellishment. The stamp set's used for this project: Watercolor Trio (are we sensing a trend here?) and the sentiment is from the Hostess set (that you can earn free) called Picture This. I wrapped ribbon around the end & tied that with linen thread and added a monogram letter and stuck a large brad in the other end. I used Stampin' Write markers on the sentiment and the flower image so they would turn out multi-color instead of using an ink pad to make the whole image one solid color.

Anyway, nothing fancy - just really basic easy projects.

Thanks for stopping by!

Blessings;

~§hawnie
Posted by Picasa

Thursday, June 24, 2010

Just more Cards

Hey there; Haven't been feeling very well lately, but thought I would at least upload the cards I've been working on. Both of the grandbabies got the crud, so we have been worried about them. Dr is still in the process of trying to get my pain levels under control - can't wait until we find the right combination. I am so thankful for my family. They have been so patient and understanding. I don't deserve them.


Posted by Picasa

Monday, June 21, 2010

Flighty Thanks

I just love butterflies! This card was inspired by Dawn O's Website (I told you I loved this website!) I stamped the butterfly immages with white pigment ink, used Heat & Stick Powder, heated it, and then sprinkled Dazzling Diamonds and then re-heated to seal in the glitter so it wouldn't flake. Then I punched them out with the matching butterfly punch, and then used my Stamp-a-ma-jig to perfectly place the outline of the butterflies' wings and body. The below shot is at a different angle to try to capture more glitter. For an added touch since the matt had black in it, I inked up a little flower from the same set and stamped the ribbon. (before doing this, make sure the ink doesn't bleed on a separate piece of ribbon).

This card was created with the following - Stampin' Up! Supplies unless otherwise noted.
Stamps: Flight of the Butterfly
Paper: Pink, Black, confetti white, and Certainly Cellery
Ink: Whisper White Craft ink & Basic Black classic ink
Goodies: Ribbon and Dazzling Diamonds
Tools: Heat and Stick Powder, Butterfly Punch, and stamp-a-ma-jig for perfect placement.
Posted by Picasa

A True Friend

I learned to make the multi-colored Boho flower from Dawn O's website. I love her website because I learn a lot of techniques and tricks there.


This card was created with the following - Stampin' Up! Supplies unless otherwise noted.
Stamps: True Friend
Paper: Chocolate Chip, Creamy Caramel, Rose Red, Pretty in Pink, and Confetti White
Ink: Rose Red and Old Olive
Goodies: Ribbon, Large Eye-lets, and Dimensionals
Tools: Bubble Corner Punch from ek Memories, Pointed 5 petal flower punch, and Real Estate Sign punch from ek Memories

Hope you enjoy!
Posted by Picasa

Best Wishes


This card was created with the following - Stampin' Up! Supplies unless otherwise noted.
Stamps: Watercolor Trio and Short and Sweet
Paper: More Mustard, Not Quite Navy, & White Confetti
Ink: Stampin' Write Markers were used to color the stamp: Rose Red, Regal Rose, Old Olive, More Mustard, Not Quite Navy
Goodies: Ribbon
Tools: Word Window Punch, Scallop Trim Border Punch, and Paper Piercing Matt
Posted by Picasa

My Heart Belongs to You

I haven't used that little sentiment for a long time and I haven't used bright colors on a card. I like red, I just don't use it that often, so I figured the sentiment matched red, you know, hearts, love, flowers (awash with flowers stamp set), etc...

This card was created with the following- Stampin' Up! Supplies unless otherwise noted
Stamp Set: Awash with Flowers & misc sentiment (manufacturer unknown)
Paper: Real Red, Orchid Opulence
Ink: Real Red, Orchid Opulence, Bermuda Bay, Basic Black
Goodies: Eyelets and Buttons
Tools: Stamp-a-ma-jig (for perfect placement of the flower stamps) & EK Success punch

Thanks for stopping by!

Blessings;


Posted by Picasa

Saturday, June 19, 2010

Thank You Butterflies


Card was made using the Top Note Die, Sizzix labels #2 die, Hemp, eyelets, and Brocade Blue ink. Kind of plain, but hopefully the recipient will appreciate it. ")
Posted by Picasa

Friend Card

Goodness! I sure have been busy today! I'm not feeling too bad & wanted to take advantage of it as much as I could before I start hurting again. So, here we have a "Friendly" Friend card. I suppose you could give this to a friend if you wanted to. hehehe

This card was created with Vintage Vogue (I really wish i would have gotten this stamp set a long time ago) I really like the patterns and the Tiny Tag's set was used for the two tiny tags. Punches used were the tiny tag punch and the scalloped trim border punch. The ribbon is Stampin' Up! exclusive ribbon that came with the Sherbet collection. The colors used - ink and cardstock: Soft Suede and Bravo Burgundy. The white cardstock is confetti white. I really like the way this card turned out! I think I'm going to play with some other color combinations with this pattern & see what I come up with. Stay tuned!
Thanks for stopping by!

§hawnie®
Posted by Picasa
This card was Cased by Jean from Jean Stamps. I really liked the color combination that was used: Close to Cocoa, Barely Banana, & Sage Shadow. I used Stampin' Write markers to color the flower stamp and included the sentiment that came with the Watercolor Trio stamp set. Embossed the Barely Banana matt with the Elegant Flowers embossing folder and finished it off with a ribbon and a few large eyelets.
It's the Thought card was created with the It's the Thought stamp set that can be selected as a Free Hostess set. I added some butterfly buttons from the Itty Bitty Bit's stamp set, buttons, & shaped punch.

Thanks for stopping by!

~§hawnie®
Posted by Picasa

Fathers Day is Coming!

The Fathers Day card above was cased from Belinda's website. She makes the most beautiful cards,you really should check it out.


The Smile card is actually something I was playing with, color combinations, punches, & Sizzix dies.
Posted by Picasa

What I've Done Lately

I would like to first start out with the Graduation Card I made for my Best Friend's daughter. I am so proud of her and am really glad that my best friend was able to experience this. There is no greater feeling than the pride and joy you feel when your child walks down the isle to get their diploma. Perhaps some day I will experience that. For now, though, I will live vicariously through Cyndi! LOL

Anyway, the card: I just love the colors pink and black. I wanted this one to match the graduate's personality. Beautiful, colorful, and femenine. (Hopefully she will approve). This is a gatefold card and when you open it from the middle, the sentiment "Congratulations" is inside.


This card, I was just goofing off. I have been wanting a score pal for a long time now, and actually found the Martha Stewart version at my favorite scrapbook store in Florence for half the price of the score pal. Anyway, I was just scoring my heart out & figured I would slam a card together while I was at it. This could probably use some more "flair", but anyway, here it is. (I made the clouds in the back ground from using a scalloped oval peice of cardstock I had laying around - you can use anything, as long as it has a scalloped or looped edge for forming the clouds, and then taking a dauber or peice of foam, blot it on your inkpad, and then sponge on the scalloped border to achieve the clouds)
King of the Grill
I just love this stamp set! Here is a Fathers Day card I made for Bill. I was playing with my Tim Holtz Grunge Distressing dauber and ink. I never immagined distressing with different colors to achieve a different kind of effect. I didn't do it too much, I'll get bolder as I get more confident. I figured i would start out with just a little bit first.

Anyway, thank you so much for stopping by!

Blessings;

§hawnie® B
Posted by Picasa

Tuesday, June 15, 2010

Judy Card


Here is a card that Judy put together with Vie's guidance. I like how these ladies are not afraid to try several different techniques on one project! Using the Nesties die, distressing, stamping, brads for embellishments, & ribbon w/ border punch. Great color combination also!
Posted by Picasa

Card from Vie


Here is a great outdoorsy card Vie made. I like the way the ribbon coordinates & pulls everything together. Great job Vie!
Posted by Picasa

Birthday Card from Viresa


This Birthday card was made by my good friend Vie. She is creative and is always open to learning any technique I throw at her. I really like the color combination she used on this card and the placement of the sentiment. Great job Vie!
Posted by Picasa

Butterfly Tri-Fold Shutter Card

Can you not tell that I love butterflies?! This card was fun to make & didn't take as long because i'm getting more comfortable with making them. The thing that takes the longest is cutting all the peices to add to the card.

The Elements of Style stamp set was used and I watercolored the flowers and distressed the edges of all the papers.
Posted by Picasa

Elegant Thank You Card


This card was put together pretty quickly. I actually got an idea from a man's stamping website, yes, that's right I said a man's website - his name is Mike Funke (You should be able to click on his name to visit his website). I was rather intrigued by the thought of men stamping and creating cards, so i clicked on his name in a blog I visit often. His work is beautiful & creative. Once I viewed other mens' creations, I now feel guilty for my pre-conceived notions that men, too are capable of being just as imaginative and creative and expressing that with paper arts as women!

Anyway, I hope you enjoy this card as much as I enjoyed CASE'ing it. (CASE: In the stamping industry it's acceptable and appreciated to CASE someone elses work. No plagiarism. Copy and Share Everything is the meaning of CASE)
Posted by Picasa

Monday, June 14, 2010

Butterfly Card in a Trinket / Gift Box

I am so excited to share this with my viewers! I had another late night where I was hurting & couldn't sleep so I decided to try my hand at something different and here is what i ended up with.
A beautiful little folded gift box filled with a surprise and a message. There is still enough room to add a gift for my adoring husband for fathers day (hence the masculine colors). I'm not sure what I'm going to put in it just yet, but I've got a little while longer to decide.
If you are interested in getting the pattern to create this box, please send me an email and I'll send it to you. The paper rose in the box was our class focus last week. I said "you can't make just one" and it stands true! I am still making them because they are so easy to make and they are beautiful. I have a bunch stored because you never know when you're going to need a paper rose ")
Anyway, thank you for dropping by!

Blessings!

~§hawnie®
Posted by Picasa

Sunday, June 13, 2010

Birthday Card by Vieresa P

Vie made this adorable Birthday card.  It's so cute I'm going to case it!
Related Posts Plugin for WordPress, Blogger...